How To Create Artistic Media From A Photograph

Use Photoshop Elements Layers to Create the Art
By using layers and filters you can turn a picture that may not be your favorite into a stunning piece of art! I first saw this technique used by David Rowley in the book by John Clements, entitled An Intermediate Guide to Digital Photography. I have found that busy pictures with lots of people or different objects work the best. The steps for creating your artistic media are given below. I have used Photoshop Elements 9, but earlier or later versions should also follow the screen captures that I show as the steps are quite similar on all versions.
An Excellent Book On Artistic Post Editing
This is a collection of different artists' ideas for creating art from photographs. My lens is based on the work of David Rowley shown in John Clement's book.

Step 1 - Crop The Photograph, If Required - Make it fit a standard frame size.

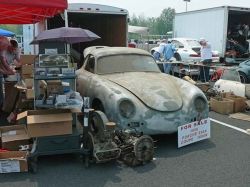
Open your photograph in Photoshop Elements and crop the picture to improve its composition if necessary. To crop, in the Editor, select the Crop tool (See the blue circle in the photo) and drag over the part of the image you want to keep. When you release the mouse button, the crop marquee appears as a bounding box with handles at the corners and sides. Adjust the size, or rotate the crop marquee using the handles. When you are satisfied, click the green Commit button located at the bottom right corner of the marquee.
Step 2 - Apply The Palette Knife Filter - Give your photo the feel of a painting.

Adjust the contrast and brightness, if necessary using Levels. Levels is found under Enhance/Adjust Lighting.
Create three background layer copies by dragging the background layer over the Create A New Layer icon (See the red circle in the Step 1 photo ). The last two layers are then switched off by clicking the Eye icon to make them invisible. On the remaining background copy apply the Palette Knife (Filter/Artistic/Palette Knife). Set the stroke size and stroke detail. Here, I used 6 for stroke size and 3 for stroke detail. Rename the layer "Palette Knife".
Step 3 - Increase Saturation - Bring out your photograph's colors.

Now adjust the Saturation to around 70 or higher. (Enhance/Adjust Color/Adjust Hue and Saturation). You can also try increasing the lightness (Enhance/Adjust Lighting/Brightness and Contrast) a little. To make the colors soften and blend better you can apply a small amount of Gaussian Blur to this layer. (Filter/Blur/Gaussian Blur). For this, I set the radius to 4.0.
Step 4 - Apply Dry Brush Filter - The dry brush technique will be blended with the palette knife technique of painting.

On the second background copy, click on the eye icon to make it visible and use the Dry Brush Filter (Filter/Artistic/Dry Brush). Adjust the sliders until you get the desired effect. Rename this layer "Dry Brush".
Step 5 - Apply The Smart Blur Filter - Use the edge only mode.

Now click on the third background copy eye icon to make it visible. Adjust this layer with the Smart Blur filter (Filter/Blur/Smart Blur). Select Edge Only from the Mode options. Adjust the sliders for radius and threshold for your desired effect. Here I used 15 for radius and 50 for threshold. Rename this layer "Smart Blur".
Step 6 - Invert The Smart Blur Layer - This will provide a charcoal drawing effect.
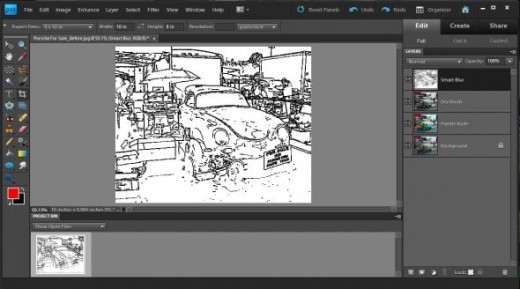
The white lines against the black background are then inverted using Filter/Adjustments/Invert. This gives the layer a charcoal drawing effect. You can enhance this effect using the Poster Edges filter (Filter/Artistic/Poster Edges).
Step 7 - Blend The Layers Together - Compare the before photograph with your artistic media.
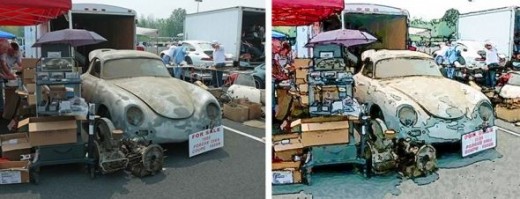
The last step is to blend the layers together. Selecting the Smart Blur layer click on the blend mode that has Normal as default and select Soft Light. You can then adjust the opacity of all three background copy layers to finalize your art work. You can see the before and after pictures above.
My Zazzle Stores - Photography and Artistic Media
I currently have two stores on Zazzle to display and sell my photographic art.
- CRB Photography Zazzle Store
The CRB Photography store has a selection of prints and artistic media. They are offered as 11 x 16 prints, standard or custom framed, as photo canvas, or on wearing apparel and photo bags. - Lakeshore Studio Zazzle Store
The Lakeshore Studio store has my unique "Message In My Soup" merchandise, including greeting cards, aprons, photo bags, mugs, and wearing apparel.
My Personal Website
- My CRB Photography Web Site
The CRB Photography web site has 50 to 60 photographs taken at locations as varied as from Florida to Portugal.
Post editing software


I would be very pleased to hear from you about this lens and the artistic media on my CRB Photography store.